|
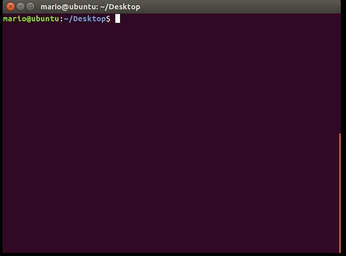
Within Ubuntu the main form of control and communication over the computer is through the terminal. The terminal in Linux allows you to have complete access and control over everything, therefore it is very important that we understand how the terminal works and how we should use it properly. |
|
|
In order to open the terminal, within the Ubuntu virtual machine that we previously set up in the last section, please hold the keys, “CTRL+ALT+T”. This will open up a terminal that looks like the following below.
|
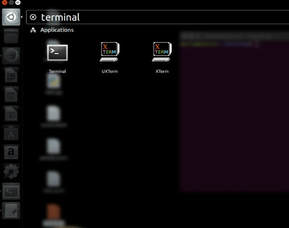
Another way to open up the terminal is to click on the search button on the top left of the screen and type in the word “terminal.” This will bring up the terminal for the currently logged in user.
By default, the terminal will open under the permissions of whichever current user is logged in. If you wish to check which user is currently logged in, you can type the command: whoami and it should display your username.
If you wish to change which user you are logged in as, you can type the command:
$ sudo -u username
Now you can check again which user you are logged in as, by using the command: $ whoami
The importance of good password practice is essential to a secure system. As a weak password could lead to the compromise of the host and in some circumstances the entire network, leading to the exposing of user or company sensitive data.
A good password is one that follows these guidelines:
Now that you understand the importance of password complexity we can ask our Ubuntu Operating System to enforce such guidelines so that all users will be forced to follow the rules.
The following will enforce one uppercase letter, a lowercase letter, a number, and a symbol, however cracklib needs to be installed before enforcing the password complexity, thankfully, Ubuntu normally installs cracklib by default, if needed, please run the command:
$ sudo apt-get install libpam-cracklib to install cracklib.
After enforcing password complexity, next we need to enforce password history.
It is crucial that you do not use passwords that have been used in the past, thankfully Ubuntu can also be assigned to remember previously used passwords.
PASS_MIN_DAYS 10
PASS_WARN_AGE 7
Doing the above will set the maximum number of days before your password expires, the minimum number of days you can keep a password, and the number of days before a warning is displayed that your password is about to expire.
Of course, there are plenty of other password policies that can be implemented by Ubuntu, however for the sake of simplicity these are the two major categories that will help prevent against weak passwords.
A good password is one that follows these guidelines:
- The password has no relation to you
- The password has not been used in the past
- The password has at least one capital letter
- The password has at least one lowercase letter
- The password has at least one number
- The password has at least one symbol
- The password contains a length of 9 characters or more (for standard users)
- The password contains a length of 14 characters or more (for administrators)
Now that you understand the importance of password complexity we can ask our Ubuntu Operating System to enforce such guidelines so that all users will be forced to follow the rules.
- The first step is to modify the password policy file please type this command within the terminal:
- Add the following line before pam_unix.so:
- Next, save the file and close it
The following will enforce one uppercase letter, a lowercase letter, a number, and a symbol, however cracklib needs to be installed before enforcing the password complexity, thankfully, Ubuntu normally installs cracklib by default, if needed, please run the command:
$ sudo apt-get install libpam-cracklib to install cracklib.
After enforcing password complexity, next we need to enforce password history.
It is crucial that you do not use passwords that have been used in the past, thankfully Ubuntu can also be assigned to remember previously used passwords.
- The first step is to modify the login definitions file, please type this command within the terminal: $ sudo gedit /etc/login.defs
- Next, search for the line PASS_MAX_DAYS and set the following variables:
PASS_MIN_DAYS 10
PASS_WARN_AGE 7
Doing the above will set the maximum number of days before your password expires, the minimum number of days you can keep a password, and the number of days before a warning is displayed that your password is about to expire.
Of course, there are plenty of other password policies that can be implemented by Ubuntu, however for the sake of simplicity these are the two major categories that will help prevent against weak passwords.
Within GNU/Linux just like with the Windows Operating Systems, a user who has ultimate privilege, or administrator access, exists. This user is called the root user, as the Ubuntu operating systems exists in a tree-like design and the roots of the tree are the bases of everything.
In order to add a normal user in Ubuntu, type in the command:
$ sudo useradd username
If you wish to remove a normal user in Ubuntu, type in the command:
$ sudo userdel username
If you want to check to see if your changes were successful you can type in the command:
$ sudo cat /etc/passwd
After typing this command into the terminal, please scroll to the bottom and if you see your username’s name, then you know that your changes were successful!
The above commands are internal commands within Linux, meaning that regardless of the operating system, as long as it is GNU/Linux based, it should work. Which will come in handy if you ever decide to experiment with other distributions.
Within GNU/Linux just like with the Windows Operating System, a user can belong to a group and this group can further dictate the privileges this person can have. Such privileges can be as specific as to dictating which users are allowed to insert USB’s, which users are allowed to access the internet, and even which users can access the sensitive documents within the system. All of which add the overall security, as Linux truly allows you to have full control over everything.
You can check to see which groups you belong too by typing in the command: $ groups
You can check to see which groups you belong too by typing in the command: $ groups
User management is an incredibly important skill to have as a system administrator. Before we dive into the advanced user manipulation, we must understand the different types of users.
The major three types of users:
Even if a normal user requires certain permissions of the administrator, it is better to assign that normal user with the specific permissions, rather than grant them full administrator privileges. The reason is that administrators have full control over the system, allowing them to virtually unregulated access.
Now, these are three main categories, however Linux makes this very confusing, very quickly.
The highest administrator is the root user, now in Linux we do not call administrators admins, instead we call them sudoers. The reason is because if you want to conduct an administrative task, you have to use the sudo command.
The lowest level of privileges is the Guest user, this person cannot create permanent files and cannot access anything that could potentially alter the system. However, just because they have limited access does not mean that they should go unwatched. A user accessing the guest account is still accessing the system and through exploitation can access the administrator’s account. Therefore, for best practice it is recommended that you disable the guest account on any production level system.
The next level upwards is the normal user, this is where most of your accounts should reside. They have enough permissions to conduct daily tasks and then some, but cannot perform any sudo level tasks. Meaning that they can create permanent files, they normally have their own files within home directory, and often are allowed to read system critical information, but cannot edit these files.
Next, within Linux exists the sudoers group, or the group of people who are allowed to perform administrative tasks. They reside above the normal users as these users have complete control over the system. For most distributions, the sudoer can perform system level tasks, however certain tasks or commands may be flagged and prevented from running. Ubuntu is notorious for preventing certain commands from being run by a sudo user, but instead allowing the root user to run the task. Ubuntu treats sudo users differently than other distributions. Whenever you type in the command to enter root user, the Operating System will take you to the user you are logged in as, root’s user, not the root user of the operating system. You have to enter in the command su - again to enter into the true root user. The reason being is that by default, Ubuntu locks the root user, attempting to prevent against permanent mistakes.
Higher than the sudo user, but still underneath the administrative umbrella is the root user. This user has complete access over everything within the system and there is very little the root user cannot do. Unless a system critical flag is in place, the root user can perform any task. I cannot emphasize how important it is to try and avoid the root user as much as possible. As anything done here will be permanent and very difficult to correct.
Now that you understand how user’s work within Ubuntu, we can add and remove permissions.
Within Linux two commands exist that allow you to add users to the system. The first is adduser, if you are using a Debian based system, this is a perl script that cleanly adds whatever user you specify within the arguments. The next command is useradd and this a UNIX-based command, meaning that no script is involved. For other distributions besides Debian-based, the adduser command symbolically links to the useradd command, meaning that they do the same thing.
The command useradd is very powerful, as it allows you to specify everything about the user, including what shell you want them to have.
For instance:
The -c flag indicates that a comment is to be placed:
# useradd -c “Joe Smith” joe
The -d flag indicates the specific home directory if needed changing:
# useradd -d /home/john joe
This is beneficial as by default, Linux automatically creates the user’s home directory with their name, but if for reason you need the home directory to be created underneath another name, then this is very useful.
The -e flag indicates the date on which the new account will expire:
# useradd -e 2017-11-25 joe
The -f flag indicates how many days passed the password expiration will the password be disabled:
# useradd -f 0 joe
The -s flag indicates what shell you want to the user to have:
# useradd -s /bin/bash joe
The -u flag indicates the numerical value for the user ID:
# useradd -u 1004 joe
The user ID is a unique ID that is given to every user, whenever their account is created. This is critical as the operating system references your user ID to see if you have the permissions necessary to perform any task. Standard practice dictates that ID values between 0 and 999 are reversed for system accounts and anything over 999 is reserved for user accounts.
The command userdel is very powerful as well, as it allows you to delete all entries of a user, the only caveat is that the user most exist.
To Delete a User:
# userdel joe
To Force a User Deletion:
# userdel -f joe
To Remove User’s Home Directory:
# userdel -r joe
Group management is an important topic as well whenever discussing users. Groups are this idea of collecting different users who need the same permissions or who perform the same tasks. For instance, a group within Linux can be created for people who need access to a specific directory, like users in the accounting department or in the human resources department and so forth. Within Linux you can view who belongs to which group by using the command groups <username>. However, if you want to edit which groups a user belongs too, this can be found in /etc/group.
If you want to add a group, you can use the command:
# addgroup <groupname>
If you want to add a user to a group, you can use the command:
# adduser <username> <groupname>
Remember that everything within Linux is treated like a file, meaning that altering groups is extremely easy. In addition, you can also edit who is able to read, write, and execute certain files based off permissions they possess.
The command chmod allows you to edit the permissions of files or directories. Essentially, allowing you to define what a user can do to the file.
The command can be used as the following:
# chmod 777 test.txt
# chmod 644 test.txt
# chmod 000 test.txt
0 – no permission 1 – execute
2 – write 3 – write and execute
4 – read 5 – read and execute
6 – read and write 7 – read, write, and execute
Along with being able to change permissions, you can also change who owns a file, this can be done using the command chown.
An example would be:
# chown root <filename>
You can see what permissions a file has by using the command:
$ ls -l <filename>
An example output would be:
$ ls -l test.txt
-rwxrwxrwx 1 root root 7545 Oct 21 10:49 test.txt
We can see that root is the owner of the file and root is the group of user, this file has all permissions, meaning that everyone can read, write, and execute the file. The first three indicate that the owner (root) of the file has all permissions, the ability to read, write, and execute. The second three indicate the group (root) can read, write, and execute. The last three, indicate that everyone else (guests) can read, write, and execute.
The major three types of users:
- Administrator The guest user is the lowest level, they have the least of permissions.
- Normal user Normal user is what the majority of users should be categorized as, unless specified otherwise.
- Guests
Even if a normal user requires certain permissions of the administrator, it is better to assign that normal user with the specific permissions, rather than grant them full administrator privileges. The reason is that administrators have full control over the system, allowing them to virtually unregulated access.
Now, these are three main categories, however Linux makes this very confusing, very quickly.
The highest administrator is the root user, now in Linux we do not call administrators admins, instead we call them sudoers. The reason is because if you want to conduct an administrative task, you have to use the sudo command.
The lowest level of privileges is the Guest user, this person cannot create permanent files and cannot access anything that could potentially alter the system. However, just because they have limited access does not mean that they should go unwatched. A user accessing the guest account is still accessing the system and through exploitation can access the administrator’s account. Therefore, for best practice it is recommended that you disable the guest account on any production level system.
The next level upwards is the normal user, this is where most of your accounts should reside. They have enough permissions to conduct daily tasks and then some, but cannot perform any sudo level tasks. Meaning that they can create permanent files, they normally have their own files within home directory, and often are allowed to read system critical information, but cannot edit these files.
Next, within Linux exists the sudoers group, or the group of people who are allowed to perform administrative tasks. They reside above the normal users as these users have complete control over the system. For most distributions, the sudoer can perform system level tasks, however certain tasks or commands may be flagged and prevented from running. Ubuntu is notorious for preventing certain commands from being run by a sudo user, but instead allowing the root user to run the task. Ubuntu treats sudo users differently than other distributions. Whenever you type in the command to enter root user, the Operating System will take you to the user you are logged in as, root’s user, not the root user of the operating system. You have to enter in the command su - again to enter into the true root user. The reason being is that by default, Ubuntu locks the root user, attempting to prevent against permanent mistakes.
Higher than the sudo user, but still underneath the administrative umbrella is the root user. This user has complete access over everything within the system and there is very little the root user cannot do. Unless a system critical flag is in place, the root user can perform any task. I cannot emphasize how important it is to try and avoid the root user as much as possible. As anything done here will be permanent and very difficult to correct.
Now that you understand how user’s work within Ubuntu, we can add and remove permissions.
Within Linux two commands exist that allow you to add users to the system. The first is adduser, if you are using a Debian based system, this is a perl script that cleanly adds whatever user you specify within the arguments. The next command is useradd and this a UNIX-based command, meaning that no script is involved. For other distributions besides Debian-based, the adduser command symbolically links to the useradd command, meaning that they do the same thing.
The command useradd is very powerful, as it allows you to specify everything about the user, including what shell you want them to have.
For instance:
The -c flag indicates that a comment is to be placed:
# useradd -c “Joe Smith” joe
The -d flag indicates the specific home directory if needed changing:
# useradd -d /home/john joe
This is beneficial as by default, Linux automatically creates the user’s home directory with their name, but if for reason you need the home directory to be created underneath another name, then this is very useful.
The -e flag indicates the date on which the new account will expire:
# useradd -e 2017-11-25 joe
The -f flag indicates how many days passed the password expiration will the password be disabled:
# useradd -f 0 joe
The -s flag indicates what shell you want to the user to have:
# useradd -s /bin/bash joe
The -u flag indicates the numerical value for the user ID:
# useradd -u 1004 joe
The user ID is a unique ID that is given to every user, whenever their account is created. This is critical as the operating system references your user ID to see if you have the permissions necessary to perform any task. Standard practice dictates that ID values between 0 and 999 are reversed for system accounts and anything over 999 is reserved for user accounts.
The command userdel is very powerful as well, as it allows you to delete all entries of a user, the only caveat is that the user most exist.
To Delete a User:
# userdel joe
To Force a User Deletion:
# userdel -f joe
To Remove User’s Home Directory:
# userdel -r joe
Group management is an important topic as well whenever discussing users. Groups are this idea of collecting different users who need the same permissions or who perform the same tasks. For instance, a group within Linux can be created for people who need access to a specific directory, like users in the accounting department or in the human resources department and so forth. Within Linux you can view who belongs to which group by using the command groups <username>. However, if you want to edit which groups a user belongs too, this can be found in /etc/group.
If you want to add a group, you can use the command:
# addgroup <groupname>
If you want to add a user to a group, you can use the command:
# adduser <username> <groupname>
Remember that everything within Linux is treated like a file, meaning that altering groups is extremely easy. In addition, you can also edit who is able to read, write, and execute certain files based off permissions they possess.
The command chmod allows you to edit the permissions of files or directories. Essentially, allowing you to define what a user can do to the file.
The command can be used as the following:
# chmod 777 test.txt
# chmod 644 test.txt
# chmod 000 test.txt
0 – no permission 1 – execute
2 – write 3 – write and execute
4 – read 5 – read and execute
6 – read and write 7 – read, write, and execute
Along with being able to change permissions, you can also change who owns a file, this can be done using the command chown.
An example would be:
# chown root <filename>
You can see what permissions a file has by using the command:
$ ls -l <filename>
An example output would be:
$ ls -l test.txt
-rwxrwxrwx 1 root root 7545 Oct 21 10:49 test.txt
We can see that root is the owner of the file and root is the group of user, this file has all permissions, meaning that everyone can read, write, and execute the file. The first three indicate that the owner (root) of the file has all permissions, the ability to read, write, and execute. The second three indicate the group (root) can read, write, and execute. The last three, indicate that everyone else (guests) can read, write, and execute.
The file system within Linux is extremely important, as understanding it can help save time whenever searching for files and help make sure you follow the standards so that you do not destroy your image whenever modifying files.
First, we start off with the root directory.
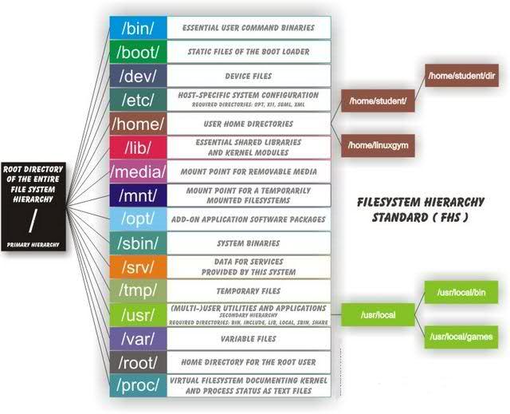
Whenever discussing Linux, remember the tree analogy, or the idea that Linux behaves like a tree, starting at one centralized point and branching off. The beginning point is the root directory, represented with a /. This is the primary hierarchy and the basis for which every absolute path will originate.
Next, above the root directory, is the /bin/ directory, short for binary, it is responsible for storing all the binary commands for the user. If you want to know where a command lies you can use the which command to find the absolute path to the binary file where that command lies. An example would be:
$ which ifconfig
/sbin/ifconfig
It is recommended that you do not edit files within this directory unless you are certain what you are doing.
Next, on the same level is the /boot/ directory, short for bootloader, it is responsible for storing the static files of the bootloader. Within Linux many different bootloaders exist, however the two most common is LILO and GNU GRUB. Many older distributions use LILO normally predating 2010, while most newer distributions use GRUB. It is recommended that you do not edit files within this directory unless you are certain what you are doing.
Next, on the same level is the /dev/ directory, short for devices, it is responsible for storing the special device files of the system. This directory is extremely important, as it emphasizes the idea that in Linux, everything is a file. Accordingly, even directories are treated as files. Within this directory you can see files like /dev/cdrom and /dev/fd0, /dev/dsp, which represent your CD-ROM drive and any floppy drive you may have, and even the speaker device. Once again, it is recommended that you do not manipulate anything within this directory.
Next, on the same level is the /etc/ directory, short for etcetera, it is responsible for storing the host-specific system configurations. This directory is the one we will become very familiar with, as it contains the configuration files for services and management. For instance, within /etc/ is where you can figure what group a user can belong too, the permissions a user has, along with the configuration files for protocols like secure shell, and even services like SAMBA.
Next, on the same level is the /home/ directory, this will be the one you will become most familiar with. Within Linux, by default, each user has a home directory. And just like a real home where you reside most of the time and keep the majority of your items, the /home/ directory is where the large majority of your own files are stored.
Next, on the same level is the /lib/ directory, short for library, it is responsible for holding the shared libraries required for the system to function. Once again, it is recommended that you do not manipulate anything within this directory.
Next, on the same level is the /media/ directory, short for removable media, it is responsible for representing the mount point for removable media. Meaning that if you plug in a USB, you should check here first to examine your device.
Next, on the same level, is the /mnt/ directory, short for mount, it is responsible for acting as the generic mount point for your filesystems or devices. Mounting is whenever you make a filesystem available to the Operating System; you cannot access the files unless it has been mounted properly. You can make mount points anywhere throughout the file system, however, it is heavily recommended that you use this directory, as it will keep things much more organized.
Next, on the same level, is the /opt/ directory, it is responsible for holding the software and added on packages that were not initially installed. It is recommended that you move packages outside of this directory, as this could cause software to malfunction.
Next, on the same level is the /sbin/ directory, short for system binaries or static binaries, it hosts files that are necessary for maintenance and administrative tasks. There is another /sbin/ folder, within the directory /usr/ this one can be manipulated as this directory hosts less crucial files. Also within Linux, a folder dedicated to system administrative programs exists, it is /usr/local/sbin.
Once again, it is recommended that you do not manipulate anything within this directory.
Next, on the same level is the /tmp/ directory, short for temporary, it is responsible for hosting temporary files, such as unsent emails, files that are downloading, and certain log files.
Next, on the same level is the /usr/ directory, short for Unix System Resources, it is responsible for storing user specific applications and packages. It is a shareable but a read-only directory, meaning that you should not edit the files here. Any files that is host-specific or varies with time should not be placed here.
Next, on the same level is the /var/ directory, short for variable, it is responsible for storing variables files. Such as system logging information.
Next, on the same level is the /root/ directory, is a very important directory, as it is the home directory for the root user. Therefore, this means that the root user gets his own directory directly connected to the root of the filesystem, whereas every other user is placed above the /home/ directory.
Next, on the same level is the /proc/ directory, short for processes, it is responsible for holding the hardware information, such as the amount of RAM, disk sizes, CPU specifications, etc. It is very unique in that it is a virtual filesystem and does not contain any real files, but is initialized and recreated every time the operating system is booted.
Side Note: There are many more directories that can be placed within the root directory, as it varies between distributions, however these above are the most essential and universal.
First, we start off with the root directory.
Whenever discussing Linux, remember the tree analogy, or the idea that Linux behaves like a tree, starting at one centralized point and branching off. The beginning point is the root directory, represented with a /. This is the primary hierarchy and the basis for which every absolute path will originate.
Next, above the root directory, is the /bin/ directory, short for binary, it is responsible for storing all the binary commands for the user. If you want to know where a command lies you can use the which command to find the absolute path to the binary file where that command lies. An example would be:
$ which ifconfig
/sbin/ifconfig
It is recommended that you do not edit files within this directory unless you are certain what you are doing.
Next, on the same level is the /boot/ directory, short for bootloader, it is responsible for storing the static files of the bootloader. Within Linux many different bootloaders exist, however the two most common is LILO and GNU GRUB. Many older distributions use LILO normally predating 2010, while most newer distributions use GRUB. It is recommended that you do not edit files within this directory unless you are certain what you are doing.
Next, on the same level is the /dev/ directory, short for devices, it is responsible for storing the special device files of the system. This directory is extremely important, as it emphasizes the idea that in Linux, everything is a file. Accordingly, even directories are treated as files. Within this directory you can see files like /dev/cdrom and /dev/fd0, /dev/dsp, which represent your CD-ROM drive and any floppy drive you may have, and even the speaker device. Once again, it is recommended that you do not manipulate anything within this directory.
Next, on the same level is the /etc/ directory, short for etcetera, it is responsible for storing the host-specific system configurations. This directory is the one we will become very familiar with, as it contains the configuration files for services and management. For instance, within /etc/ is where you can figure what group a user can belong too, the permissions a user has, along with the configuration files for protocols like secure shell, and even services like SAMBA.
Next, on the same level is the /home/ directory, this will be the one you will become most familiar with. Within Linux, by default, each user has a home directory. And just like a real home where you reside most of the time and keep the majority of your items, the /home/ directory is where the large majority of your own files are stored.
Next, on the same level is the /lib/ directory, short for library, it is responsible for holding the shared libraries required for the system to function. Once again, it is recommended that you do not manipulate anything within this directory.
Next, on the same level is the /media/ directory, short for removable media, it is responsible for representing the mount point for removable media. Meaning that if you plug in a USB, you should check here first to examine your device.
Next, on the same level, is the /mnt/ directory, short for mount, it is responsible for acting as the generic mount point for your filesystems or devices. Mounting is whenever you make a filesystem available to the Operating System; you cannot access the files unless it has been mounted properly. You can make mount points anywhere throughout the file system, however, it is heavily recommended that you use this directory, as it will keep things much more organized.
Next, on the same level, is the /opt/ directory, it is responsible for holding the software and added on packages that were not initially installed. It is recommended that you move packages outside of this directory, as this could cause software to malfunction.
Next, on the same level is the /sbin/ directory, short for system binaries or static binaries, it hosts files that are necessary for maintenance and administrative tasks. There is another /sbin/ folder, within the directory /usr/ this one can be manipulated as this directory hosts less crucial files. Also within Linux, a folder dedicated to system administrative programs exists, it is /usr/local/sbin.
Once again, it is recommended that you do not manipulate anything within this directory.
Next, on the same level is the /tmp/ directory, short for temporary, it is responsible for hosting temporary files, such as unsent emails, files that are downloading, and certain log files.
Next, on the same level is the /usr/ directory, short for Unix System Resources, it is responsible for storing user specific applications and packages. It is a shareable but a read-only directory, meaning that you should not edit the files here. Any files that is host-specific or varies with time should not be placed here.
Next, on the same level is the /var/ directory, short for variable, it is responsible for storing variables files. Such as system logging information.
Next, on the same level is the /root/ directory, is a very important directory, as it is the home directory for the root user. Therefore, this means that the root user gets his own directory directly connected to the root of the filesystem, whereas every other user is placed above the /home/ directory.
Next, on the same level is the /proc/ directory, short for processes, it is responsible for holding the hardware information, such as the amount of RAM, disk sizes, CPU specifications, etc. It is very unique in that it is a virtual filesystem and does not contain any real files, but is initialized and recreated every time the operating system is booted.
Side Note: There are many more directories that can be placed within the root directory, as it varies between distributions, however these above are the most essential and universal.
Important Files
| Files: | Description: |
|---|---|
| /boot/vmlinuz | The linux kernel file |
| /dev/null | A device that is connected to the operating system that contains nothing, programs can be pointed to print here, as everything that is within here gets deleted forever. |
| /etc/crontab | A script that is instructed to run periodically |
| /etc/group | Holds information about groups |
| /etc/hosts | Holds host names and their IP’s for name resolution whenever a DNS server is not present |
| /etc/hosts.allow | Holds a list of hosts allowed to access services |
| /etc/hosts.deny | Holds a list of hosts NOT allowed to access services |
| /etc/passwd | Holds information about system users |
| /etc/shadow | Holds password information about system users |
| /proc/filesystems | Holds information about the filesystems on the system |
Possibly one of the most important parts of working with Linux is understanding file management, as everything within Linux is treated as a file. Even directories, which are files you cannot modify as this would corrupt your hard drive. This allows for great flexibility, but also means that you can accidentally destroy things.
One of the first things to understand is how to display a file. The most common command is cat, which stands for concatenation, and it simply means, display the entire file within the terminal. Below is a perfect example of displaying the file test.txt from my home directory.
$ cat /home/moses/Desktop/test.txt
There are many other commands that can be used to just display a file as well. tail, which displays the last ten lines, head, which displays the first ten lines, tac for reverse input, all have their functionality and purpose.
File manipulation is a huge deal as well as reading files only takes you so far.
The most common and widely used methods to edit files is using the commands nano, vi, and gedit.
The command nano, which was the first program created that allows you to manipulate files is a command line based file editor. It is extremely easy to use and is the first recommended editor you should learn.
$ nano /home/moses/Desktop/test.txt
This command will print out the file test.txt that is on my Desktop into the terminal. Using the arrow keys, you can navigate throughout the lines of the file and simply typing will allow you to edit the file. To exit you have to press CRTL+X, then nano will ask if you want to save, enter in Y for Yes and N for No.
The command gedit, which is similar to nano in the fact of its simplicity, is a Graphical user interface based program; it is very similar to notepad on Windows. To edit a file in gedit, just type in:
$ gedit /home/moses/Desktop/test.txt
This command will open a window with the file test.txt printed, using the mouse along with the keys, you can navigate your way throughout the file and whenever you want to save, click on the hard drive with a green arrow with the word save.
Side Note: Vim (the program often referenced by the operating system whenever the command vi is used, as vim is the updated version of vi) is such a powerful tool that books have been written to using it effectively. Because of its complexity I will not be going over it within this introductory guide, however I highly recommend investigating everything that vim has to offer. It can be used to support programming languages, compressing files, editing files over SSH and HTTP, and even integrates with cscope. Mastering vi is an artform that can take months to become an expert in. Because of limited space, if you wish to study vi further, please visit: http://www.yolinux.com/TUTORIALS/LinuxTutorialAdvanced_vi.html
Within Linux just like with Windows you can search for files. With Linux two commands dominate; the first is find and the second is locate. Now in the end they both should help you find your file, but they are going to go about searching for those files through different methods.
The find command will actually search throughout the system, meaning that this method is normally slower, but is always up to date, as it is scanning the system in real time.
The locate command will search through a build database, meaning that it is much faster, but may not give back the most up-to-date results.
The find command can be used like this:
$ find /home -name test.txt
The above command will search throughout my home directory for the file name test.txt
The locate command can be used like this:
$ locate test.txt
The above command will search throughout a database for the path to the file test.txt.
Please remember that the argument to search throughout the database is case sensitive, meaning that to search for files that are case-insensitive please use the -i option:
$ locate -i test.txt
It is crucial that you understand the risks of sharing files. The best practice is the idea of least privilege. Meaning that you give users only what they need to access and nothing more. For example, it is a great idea to give someone in the Accounting department access to the Accounting directory, but a horrible idea to also give them access to the Tech Support directory. This idea expands farther than just Linux, so please keep this in mind whenever you assign permissions to a specific file.
The command chmod is commonly used whenever dealing with file sharing management, as permissions of a file for a specific group are what allow a file to be either read, written, or executed.
Because of the versatility of Linux it is also possible to create a shared folder. To do this in Ubuntu, select the folder you want to share, right click and press Permissions, then select Network Sharing. From here select the box next too Share this folder and edit any features needed, then click Create Share.
Depending on the services you have installed, it might ask if you want install the sharing service, if so, please install the service as it is required to share any file. From there, you can edit the permissions of the file/folder shared to make sure users and guests are limited in their actions.
In Quick Terms:
Within Linux, there are six stages of the boot process. The boot process is the process that starts whenever you push the button to turn on your computer after it has been shut off. It is the process of ‘booting up’ or turning on. The first is the BIOS (Basic Input, Output System) which calls for the MBR (Master Boot Record) to run, this in turn calls for the GRUB (Grand Unified Bootloader), which then calls for the kernel, which in turn calls Init, which executes the run level programs.
Explained In-Depth Terms:
The first part that loads after you push the ON button is the BIOS, this checks to see if a boot loader program is present on whatever media chosen. A bootloader can be found on a floppy disk, a CD, a USB, even a hard drive. The boot loader is then loaded into memory and the BIOS gives privileges to it. Next the Master Boot Record, which is less than 512 bytes, contains information about GRUB and helps execute the GRUB loader. The GRUB loader is responsible for allowing the user to select which kernel image they want to execute, which means allowing the user to pick which Operating System they want to start. Therefore, in short, the GRUB just loads and executes the kernel. The kernel is extremely important, as it is lowest level of software and is the interaction between both the hardware and software world. Meaning that the kernel is the core of the operating system. After the GRUB loads the kernel, the kernel will execute the /sbin/init program. The init program is the first program executed by the kernel, therefore it will have a Process ID of 1. The init daemon is started whenever the computer starts and continues to run until shutdown.The init program will then look at the /etc/initab file to decide the runlevel, the level of the runlevel will decide which programs execute, which in turn will dictate what the user is permitted to do. Different runlevels means different levels of permission the operating system will have, 0 means halt, 1 means single user mode, 2 means multiuser without NFS, 3 means full multiusermode, 5 means X11, 6 means reboot.
For years, init was the king whenever it came to managing runlevel tasks. However, within the past few years a replacement has risen called systemd. Systemd, just like initd is the father of all processes and is the first to start up, it also has a Process ID of 1. Therefore, meaning that computers that have systemd do not have initd. The advantages of the switch was parallel task startup. Systemd has a simpler boot process, better logging features, and works better overall at avoiding delay time, thus shorting the boot time.
Thankfully, the major distributions have system already adopted the new change, including Ubuntu. Understanding how the system itself works allows for better security, as now you understand where and how rootkits can be placed.
Networking and Linux are very familiar with each other, as often servers are created using Linux distributions.
The first network command that you should learn is ping. The ping command allows you to check to see if a host is alive and if your PC is properly sending out packets.
$ ping <IP Address>
Next, is the command ifconfig, now replaced with ip addr, it displays the status of your network configuration. It displays your ethernet, loopback, and virtual adapters. You can use the command iwconfig to display any wireless adapters and their configurations. These commands display your IPv4 and IPv6 address, the MAC address, and the network mask, along with much more information.
$ ifconfig $ ip addr $ iwconfig
Next, is the command nslookup, it allows you to look up the IP Address of a domain name.
$ nslookup www.google.com
Next, is the command traceroute, it allows you to see how many routers are between yourself and whichever specified host. It uses ICMP packets and TTL to accomplish this.
$ traceroute <IP Address>
Next, and possibly the most important is netstat. Netstat is a very useful tool for any type of Linux administration. Because of its power, it can be used to tell you what TCP and UDP connections are listening, established, or even closed. It can also be used to spot unwanted malware such as backdoors and zombie/orphan processes.
Displays all listening ports both TCP and UDP:
# netstat -a
All TCP connections:
# netstat -at
All UDP connections:
# netstat -au
Statics of each protocol:
# netstat -s
Displays routing information:
# netstat -r
Ubuntu by itself is fairly secure from malware. It is uncommon that a Linux based virus will appear on your system, instead the more common threat is from Windows-based malware. As Linux systems often act as servers or critical infrastructure to the network, that will often interact with Windows systems. Therefore, it is important that we implement a type of anti-virus on the system.
Below is the installation of ClamAV, it is an open-sourced software available across all major Linux distributions.
First is the installation:
$ sudo apt-get install clamav
Next, we have to update the virus definitions:
$ sudo freshclam
The most basic scan, checks all the files and displays each file scanned on the screen:
$ sudo clamscan -r /
Scans all files throughout the home directory, displays each file as it is scanned:
$ sudo clamscan -r /home
Scans can be more advanced and different flags can indicate different functions.
Scans every file, only displays infected while ringing a bell:
$ sudo -r --bell -i /
Scans every file in the home directory and moves infected files to a different location:
$ sudo -r --move=/home/moses/virus_quarantine /home
Scans every file in the home directory, deletes infected files:
$ sudo -r --remove /home
If you prefer a Graphical Interface for antivirus, ClamAV also has ClamTK.
To install and begin using just type in the command:
$ sudo apt-get install clamtk
- Next click on the Scan tab in the navigation bar, choose the directory or file that you want to scan.
- You can then view what has been quarantined in the Quarantine tab underneath Status. You can then empty what has been quarantined underneath Empty Quarantine Folder.
- You can schedule for automatic scans underneath the Advanced tab.
- Please make sure you check for updates, which can be done underneath the Help tab.
Secure Shell is one of the most widely attacked services, due to its commonness. Thankfully though, it can easily be secured from a large majority of attacks. Given there is no tutorial that will completely eradicate all the risks and vulnerabilities, however, taking precautionary steps can help prevent against many attacks.
To begin, we need to edit the default security options within the file sshd_config.
$ sudo nano /etc/ssh/sshd_config
One of the biggest ways to securing a SSH server is through changing the default SSH port. This can be done by changing the line Port 22 to Port <#>
Next, is to make sure that SSHv2 is being used. By default, on most systems this is the case, however, it is always best just to double check. This can be done by looking for the line: Protocol <#>
Next, it is best practice to disable root login. This can easily be done by changing the line PermitRootLogin without-password to PermitRootLogin no
Next, is to hide the last login name, as this could give hackers information about a valid user on the system. This can be done by PrintLastLog no
Next, you can also restrict which IP addresses are able to access the SSH server, as by default SSH will accept any connection. To restrict access, add the following line:
ListenAddress <IP Address>
Next, to prevent against brute force attacks, you can edit the number concurrent connections to the server that are allowed. You can do this by changing the line:
MaxStartups <#>
Next, it is recommended that we disable forwarding, as hackers can port forward through an SSH connection. To do this change the following lines to:
AllowTcpForwarding no
X11Forwarding no
Lastly, and most importantly, you can limit which users are allowed to access the server.
Creating a white list of users:
AllowUsers <username>
Creating a black list of users:
DenyUser <username>
The guest account, which in Ubuntu comes enabled by default, can be disabled through one of two common ways.
The first and easiest way is through editing the lightdm.conf file. The reason why you should try this method first is that the /etc/ directory takes priority configuration over the /usr/share/ directory.
Open the lightdm.conf file:
$ sudo nano /etc/lightdm/lightdm.conf
Then make sure this text resides within the file:
[SeatDefaults]
user-session=ubuntu
greeter-session=unity-greeter
allow-guest=false
The last line is the most important, as it tells the system to disable the guest account.
Then restart the system and the guest account should be removed.
The second and more complex method is to edit the 50-ubuntu.conf file:
$ sudo nano /usr/share/lightdm/lightdm.conf.d/50-ubuntu.conf
Add the following line within the file:
allow-guest=false
Then restart the system and the guest account should be removed.
There are other means to go about removing the guest account, however the two above are the most widely accepted. If, however the two above do not work, then the below should work.
First we have to create a new file in /etc/lightdm/lightdm.conf.d/:
$ sudo touch /etc/lightdm/lightdm.conf.d/50-no-guest.conf
Then we have to type this within the file:
[SeatDefaults]
allow-guest=false
In order to get back guest login, remove the 50-no-guest.conf file.
$ sudo rm /etc/lightdm/lightdm.conf.d/50-no-guest.conf
Firewall management is a crucial part of security, as filtering and monitoring the network traffic can help prevent against unwanted attacks.
Ubuntu is so versatile that it can be used act as the firewall for an entire network, but for now host-based firewalls are the main focus.
Ubuntu be default uses the Uncomplicated Firewall, or UFW. This firewall setup is extremely useful whenever you are in a rush, due to its simplicity. Sadly however, other distributions do not come preinstalled with UFW. To install UFW, please type in the command:
$ sudo apt-get install ufw
First it is best practice to check to status of the firewall:
$ sudo ufw status
Side Note: If the firewall is off, it will state inactive, if it is active, it will display any rules that have been set.
Turn On The Firewall:
$ sudo ufw enable
Turn Off The Firewall:
$ sudo ufw disable
Allow In Certain Services:
$ sudo ufw allow ssh
Side Note: UFW only knows what ssh is because it is a service listed /etc/services
Deny Certain Services:
$ sudo ufw deny ftp
Allow Certain Ports:
$ sudo ufw allow 80
Deny Certain Ports:
$ sudo ufw deny 21
Protocols:
$ sudo ufw allow 21/tcp
$ sudo ufw deny 21/udp
Port Ranges:
$ sudo ufw allow 443:448/tcp
Subnets:
$ sudo ufw allow from 8.8.8.8/10
Connections to specific Network Interfaces:
$ sudo ufw allow in on eth1 to any port 443
Specific IP Addresses to specific ports:
$ sudo ufw allow from 8.8.8.8 to any port 53
Delete rules if needed:
$ sudo ufw status numbered
$ sudo ufw delete #
Reset Rules:
$ sudo ufw reset
Understanding Manual Pages
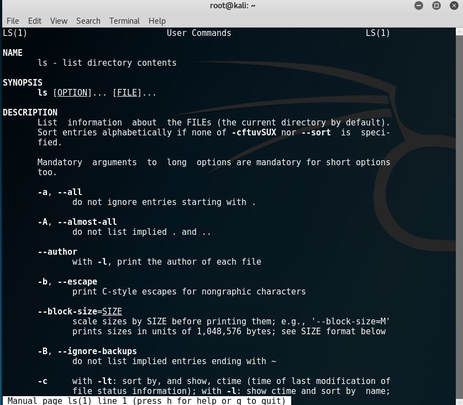
Manual pages, also known by their shortened name Man pages are incredibly useful, as they can help provide information on commands, applications, formats, and even conventions. To use a man page is fairly simple all you need is:
$ man <research topic>
So for instance, you could man the command ls and the following would display:
$ man <research topic>
So for instance, you could man the command ls and the following would display:
If you wish to get more specific with the results you can choose which man page that you want to display.
So the command:
$ man 8 <research topic>
Will display the System administration information associated with whatever topic picked.
So the command:
$ man 8 <research topic>
Will display the System administration information associated with whatever topic picked.
Manual Pages
Brought to you by: Wikipedia Man Pages
| Number: | Description: |
|---|---|
| 1 | General Commands |
| 2 | System Calls |
| 3 | Library functions, covering in particular the C Standard library |
| 4 | Special files and drivers |
| 5 | File Formats and conventions |
| 6 | Games and screensavers |
| 7 | Miscellanous |
| 8 | System administration commands and daemons |